How to use
Setup Cinema 4D Bridge
Make sure the Cinema 4D Bridge plugin is installed and the feature in Plasticity is enabled. Refer to the setup instructions here.
Basic Usage
To transfer the Objects created in Plasticity to Cinema 4D, click the "Refresh" button in the Plasticity Bridge dialog in Cinema 4D.
- Within Plasticity:
- Open Plasticity.
- Create objects that you want to transfer to Cinema 4D.
- Within Cinema 4D:
- Open the Plasticity Bridge dialog from Extensions > Plasticity Bridge. The dialog is organized into three tabs — Server, Basic, and Utilities.
- On the Server tab, enter the server address (default:
localhost:8980) and click the "Connect" button. Once a connection is established, additional options will become available.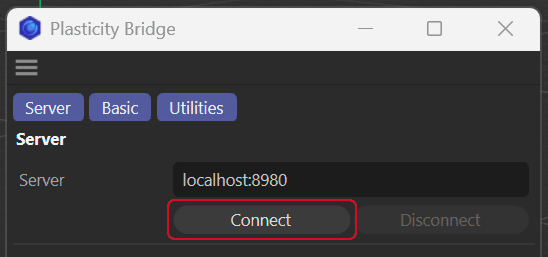
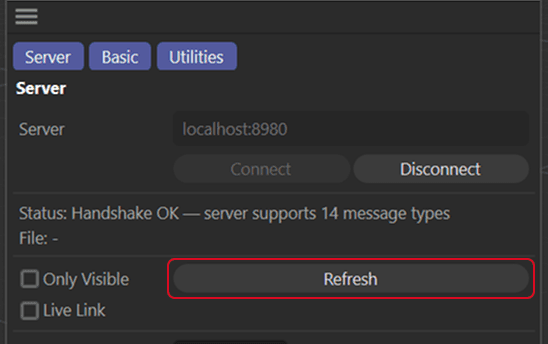
- Click the "Refresh" button to transfer objects from Plasticity to Cinema 4D.
- The transferred objects will appear in the Object Manager under a root null named after the Plasticity document.
- All Solids and Sheets in Plasticity will be transferred as Polygon Objects in Cinema 4D.
- When 'Only visible' is disabled (default), invisible objects in Plasticity will be transferred to Cinema 4D as invisible objects. When 'Only visible' is enabled, invisible objects in Plasticity will not be transferred.
- A 'Unit Scale' slider is available to scale the size. The scale is applied to the root null's transform, so changes take effect immediately and can be adjusted at any time.
- Within Plasticity:
- Edit the objects as needed.
- Within Cinema 4D:
- To update any changes made in Plasticity, click the "Refresh" button in the Plasticity Bridge dialog.
Live Link
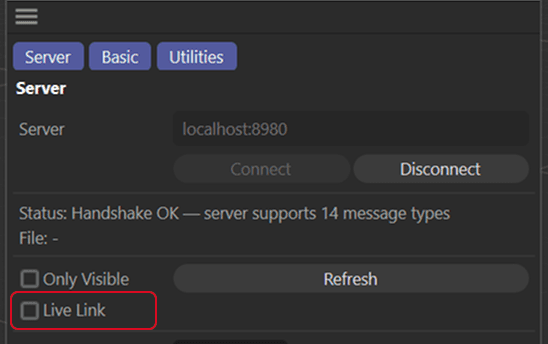
When Live Link is enabled, any changes made to the objects in Plasticity will be automatically transferred to Cinema 4D.
- Within Plasticity:
- Open Plasticity.
- Create objects that you want to transfer to Cinema 4D.
- Within Cinema 4D:
- Ensure that the Cinema 4D Bridge plugin is installed and activated.
- Enable the "Live Link" checkbox on the Server tab of the Plasticity Bridge dialog.
- Within Plasticity:
- Edit the objects as needed.
- Within Cinema 4D:
- The changes will be automatically transferred to Cinema 4D.
Refacet Mesh
The Refacet Mesh option will automatically retopologize the mesh of the transferred object. This is useful for reducing the number of polygons in the mesh, which can improve performance in Cinema 4D.
- Within Cinema 4D:
- Select the transferred objects to be retopologized.
- Switch to the Basic tab of the Plasticity Bridge dialog and click the "Refacet" button.

- You can specify the refacet config on the Basic tab.
- Tris/Ngons: The type of mesh to be generated. 'Tris' will generate a mesh with only triangles, while 'Ngons' will generate a mesh that includes polygons with five or more sides.
- Tolerance: The maximum distance between the original mesh and the retopologized mesh. A lower tolerance will result in a mesh that more closely matches the original mesh, but will also result in a mesh with more polygons.
- Angle: The maximum angle between the original mesh and the retopologized mesh. A lower angle will result in a mesh that more closely matches the original mesh, but will also result in a mesh with more polygons.
- Switch the Refacet Options toggle to Advanced to show advanced options.
- Tris/Ngons: The type of mesh to be generated.
- Min Width: The minimum width of the retopologized mesh.
- Max Width: The maximum width of the retopologized mesh.
- Edge Chord Tol: The maximum distance between the original Edge chord and the retopologized mesh.
- Edge Chord Angle: The maximum angle between the original Edge angle and the retopologized mesh.
- Face Plane Tol: The maximum distance between the original Face plane and the retopologized mesh.
- Face Angle Tol: The maximum angle between the original Face angle and the retopologized mesh.
- You can specify the refacet config on the Basic tab.
Auto-Refacet Tag
Cinema 4D Bridge also supports per-object refacet settings via a custom Plasticity Auto-Refacet tag. When the "Auto Refacet" checkbox is enabled on the Basic tab, clicking Refacet attaches this tag to the selected objects with the current settings baked in. After every subsequent refresh or live-link update, the Bridge automatically re-requests tessellation for each tagged object using the tag's stored settings, so each object keeps its own polygon density even as you continue to edit in Plasticity.
The tag parameters mirror the Basic tab — Topology (Tris/Ngons), a Simple mode with Tolerance and Angle, and an Advanced mode exposing Min/Max Width and the per-parameter Edge Chord / Face Plane tolerances and angles. You can edit these values directly on the tag at any time.
Utilities
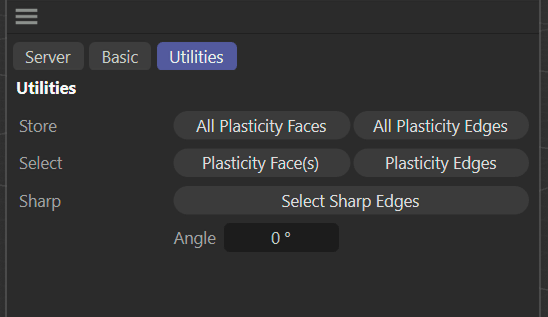
The Utilities tab exposes helpers that make use of the Plasticity face-group information stored on each transferred mesh. All actions operate on the currently selected objects in the Object Manager.
Store Faces as Selection Tags
- Creates one Polygon Selection Tag per Plasticity face group, named
Plasticity Face 0,Plasticity Face 1, and so on. This lets you assign materials per-face directly in Cinema 4D using the standard polygon selection workflow.
Store Edges as Selection Tag
- Creates a single Edge Selection Tag named
__plasticity_edges__containing every edge that lies on a Plasticity face-group boundary. This is the Cinema 4D equivalent of "marking sharps" and can be fed into modifiers such as Bevel or used with Phong break edges.
Select Sharp Edges
- Selects the boundary edges described above and puts Cinema 4D into Edge mode. An optional angle field lets you filter the selection by dihedral angle — set it to
0to select every boundary edge, or to a non-zero value to select only edges whose adjacent faces meet at a sharper angle than the threshold.
Select Plasticity Face(s)
- Expands the current polygon selection so that every polygon belonging to the same Plasticity face group is selected. Use this to quickly grow a selection out to an entire CAD face from a single polygon.
Select Plasticity Edges
- After selecting one or more polygons, executes the command to select the Plasticity boundary edges of the face group(s) those polygons belong to.
Working with PolySplines
Model your geometry in Cinema 4D and transfer it to Plasticity, where PolySplines is applied automatically. A Studio license is required in order to use PolySplines.
In Cinema 4D Bridge this workflow is built around Subdivision Surface objects. Only objects placed under a Subdivision Surface in the Outbox null are eligible for upload — plain polygon objects dropped directly into the Outbox are skipped.
Basic Usage
-
Within Plasticity:
- Ensure the scene is empty and contains no modelled objects to prevent them from being transferred to the Cinema 4D scene.
-
Within Cinema 4D:
-
Open the Plasticity Bridge dialog and click the "Connect" button on the Server tab.
-
Enable the "Only Visible" option to ensure no objects are transferred from Plasticity to Cinema 4D.
-
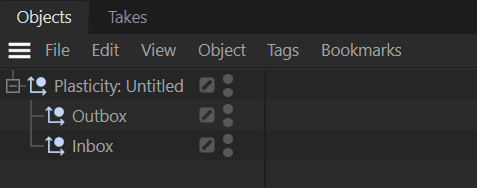
Click the "Refresh" button. A root null will appear in the Object Manager containing two child nulls: Outbox and Inbox.
-
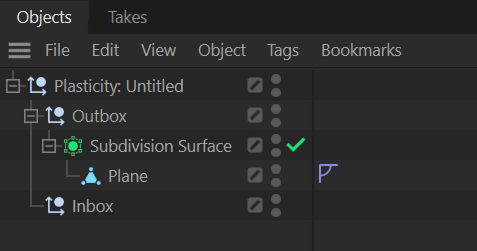
Create a Subdivision Surface object and place it inside the Outbox null. Parent your cage geometry (a Polygon Object, a primitive such as Cube or Sphere, or any generator stack such as Symmetry, Connect, Boole or Array) under that Subdivision Surface. The Subdivision Surface's Editor Subdivision level must be at least 1.
- The control cage is resolved automatically. Primitives, generators, and even nested generator stacks are evaluated through Cinema 4D's cache system, so you can upload live procedural setups without having to make them editable first.
- Objects in the Outbox are protected from incoming Plasticity updates — your cage will not be overwritten on refresh.
-
Click the "Refresh" button to transfer the objects from Cinema 4D to Plasticity.
-
-
Within Plasticity:
- The transferred objects will appear in the Plasticity 3D viewport.
- Transform data such as scale, position, and rotation is applied automatically.
- The entire generator stack under each Subdivision Surface is baked on transfer.
- The object is automatically converted to a PolySpline surface.
- The transferred objects will appear in the Plasticity 3D viewport.
Subdivision Surface options
Additional PolySpline options can be set per-SDS by adding User Data boolean fields to the Subdivision Surface object:
pns_merge_patches(default: true) — merge adjacent patches into a single surface where possible.pns_interpolate_boundary(default: false) — interpolate the boundary rather than leaving it as a crease.pns_rounded_corners(default: false) — round the corners of the generated surface.